If one of your keyboard switches isn’t functioning properly, it could be hard to diagnose the issue without disassembling the switch. The only issue is that you have no clue how to disassemble the switch. Be not afraid! We’ll go through how to disassemble a switch in this post so you can see what’s going on inside.
The two major ways to disassemble a mechanical keyboard switch are as follows:
1) To disassemble the switch, using a 1/16″ flathead screwdriver.
2) Using a specialized switch opening tool, disassemble the switch.
Understanding how a mechanical keyboard switch operates and disassembling one is a very helpful ability. The procedure is quite complicated, and certain switches are constructed differently. We’ll go through exactly what you need to do because there are various parts that are readily breakable.
Why Disassemble A Switch?
- Lube the switches
- Affix switch film
- Fix a faulty switch
- Frankenswitch it
- Spring replacement
- Get your Curiosity Sated
You might wish to disassemble your keyboard switch for a variety of reasons. You must disassemble your keyboard in order to install some of the greatest keyboard modifications. Learning how to disassemble a switch may be really helpful, whether you want to install switch film or lubricate your switches.
You might wish to disassemble your keyboard switch for a variety of reasons. You must disassemble your keyboard in order to install some of the greatest keyboard modifications. Learning how to disassemble a switch may be really helpful, whether you want to install switch film or lubricate your switches.
Not to add that a switch may be repaired by disassembling it, looking into the potential problem, and then rapidly rectifying it. If you’re really insane, you could create your own frankenswitch by stealing components from other switches to create a really one-of-a-kind switch.
Or perhaps you’re just curious about how switches function and want to disassemble them to understand how everything operates. Whatever the case, we’ll show you step-by-step how to completely dismantle a switch.
Select the Cherry or Kailh switch type
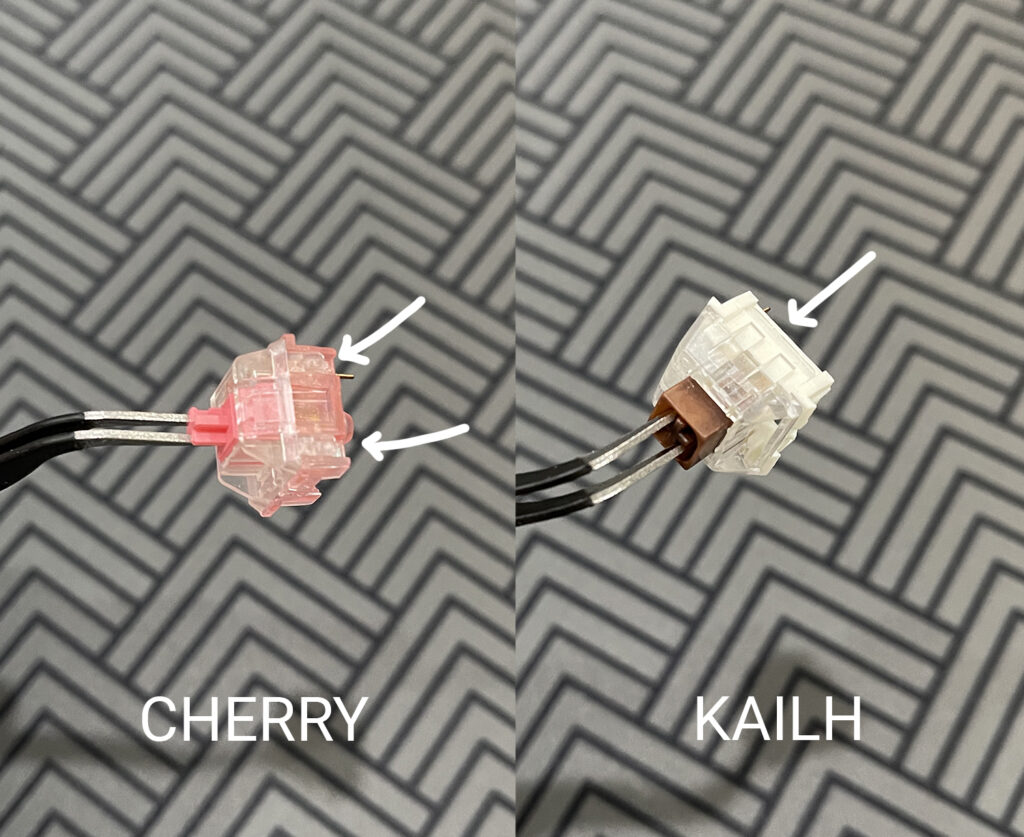
You should identify the sort of switch you have before disassembling yours. Four clips will hold a Cherry MX type switch together, however just two clips will hold a Kailh style switch together. This distinction is crucial since the Kailh type switch requires a separate switch opener tool and is significantly more challenging to open.
The switch will often be in the Cherry style if it is not from Kailh. The easiest approach to determine the sort of switch you have is to personally check it. Both switch types can be disassembled with a screwdriver, however the Kailh switch will take significantly more time and effort.
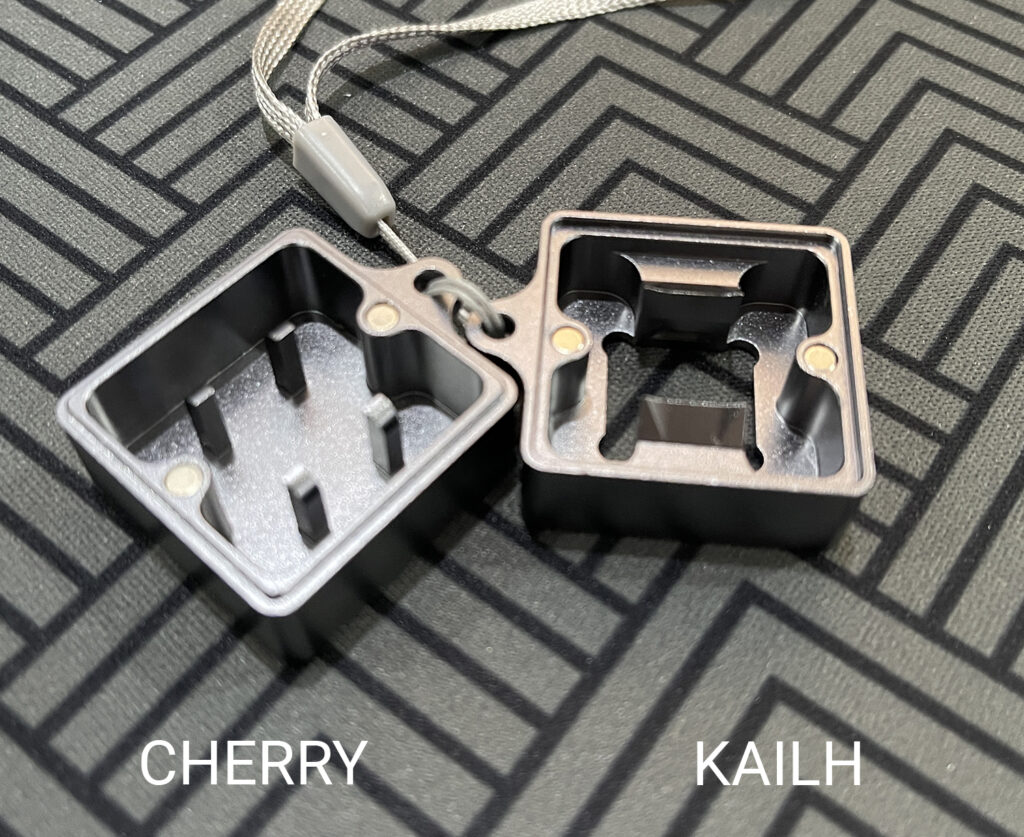
If you use a switch opener, make sure it is compatible with that particular type of switch (shown below).
How to Disassemble Switches of Mechanical Keyboard
Method 1: Screwdriver
Tools needed:
- 1/16″ (1.6mm) Tool for flathead screws
- Keyboard switches
Using a screwdriver to disassemble a switch may take a little more time than using a switch opener, and it will also require some patience and a steady hand. The advantage of this approach is that you won’t need to order any specific tools because a flathead screwdriver is widely available. You’ll dismantle switches slowly at first, but as you grow better, you’ll disassemble switches faster.
1. Release the initial clip
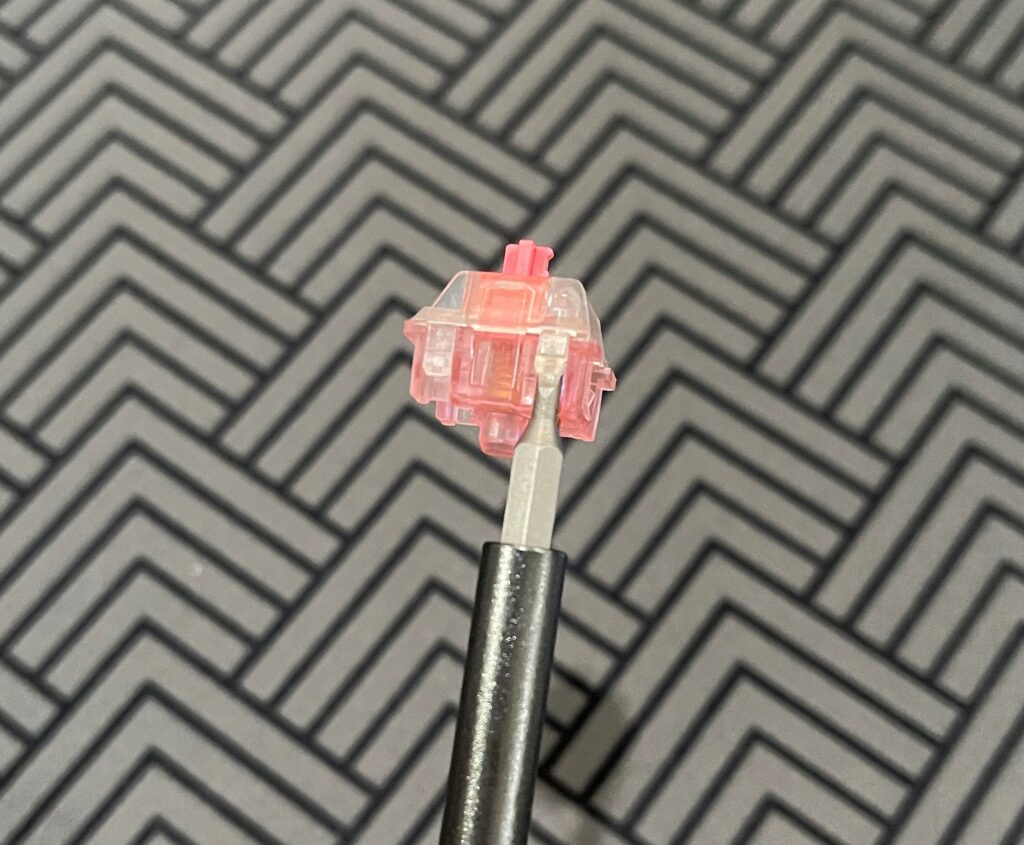
Simply releasing the first footage is the first step. To release a plastic clip, you should wedge it apart with the screwdriver head after sliding it under one of the clips.
To prevent the clips from snapping back into place once the clip has been unfastened, insert your thumbnail between the switch’s top and lower housing.
2. Decompress the second clip
The second clip, which is on the side opposite the first clip, should then have started to come loose. The tough part comes now; you need to carefully lift the clip while also being cautious that the switch doesn’t snap back together. While releasing the second clip, keep your thumbnail firmly positioned between the top and lower housing.
3. Push the Switch Open.
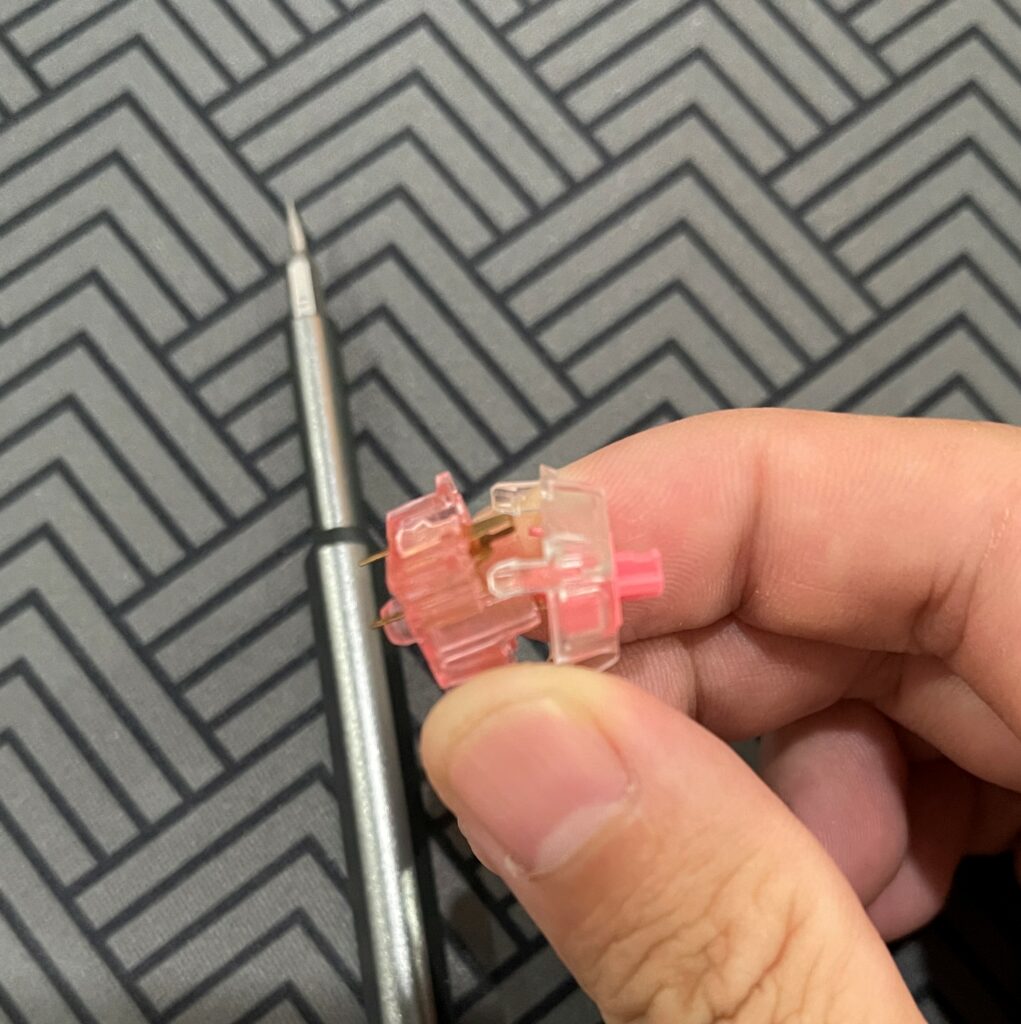
You ought to be able to pop the switch open at this point using only your hands. You should work your way around the switch, releasing the four clips, until it bursts open if it is still held together.
Method 2: Using a switch opener
Tools necessary: Cherry or Kailh switch openers – Keyboard switches
Using a switch opener instead of a screwdriver makes it much easier to disassemble the switch. The only drawback is that you’ll have to place an internet order for the specialist gadget and wait for it to arrive. But if you have the right tool, it’s really simple; this approach is excellent if you intend to disassemble lots of switches.
Step 1: Turn on the opener’s switch
The switch must first be positioned on the switch opener with the stem side facing up. The switch opener’s pegs and the switch’s clips should align perfectly. Depending on whether you have a Cherry style or Kailh switch, the pattern will be different.
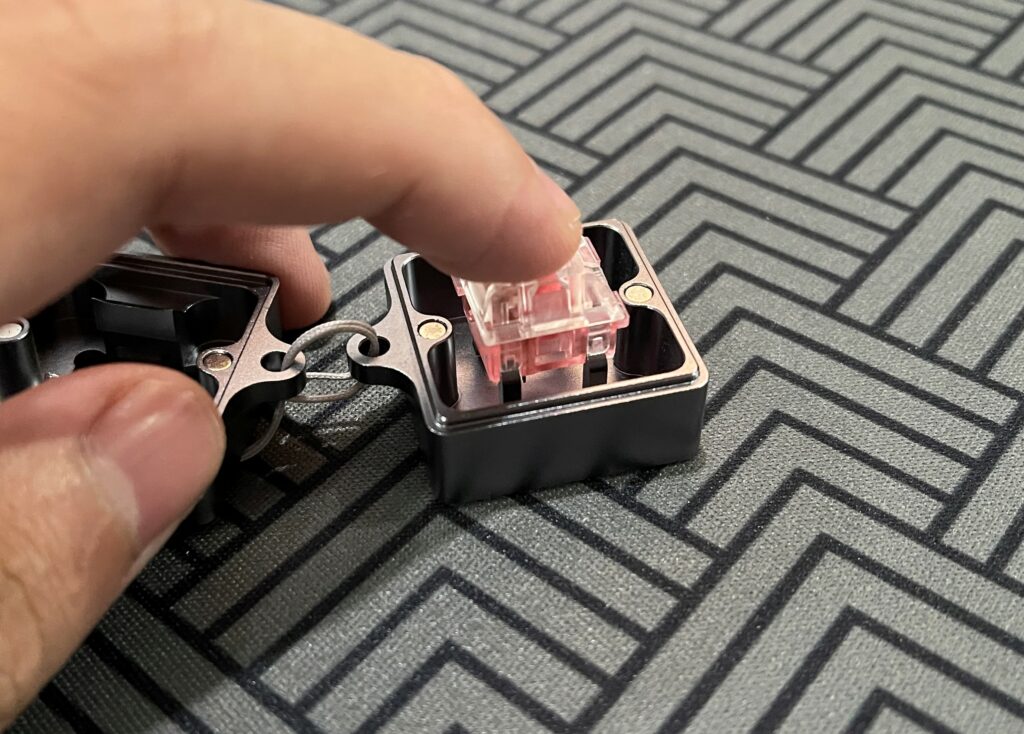
Step 2: Depress the switch firmly
The switch must then simply be depressed while it is resting on the opener as the following step. It will be simple as pie for the switch to open and turn on. If the switch won’t open, check to be that the switch is correctly positioned on the opener. You will have to apply a little more pressure on the Kailh style switch in order to activate it.
The Switch Components
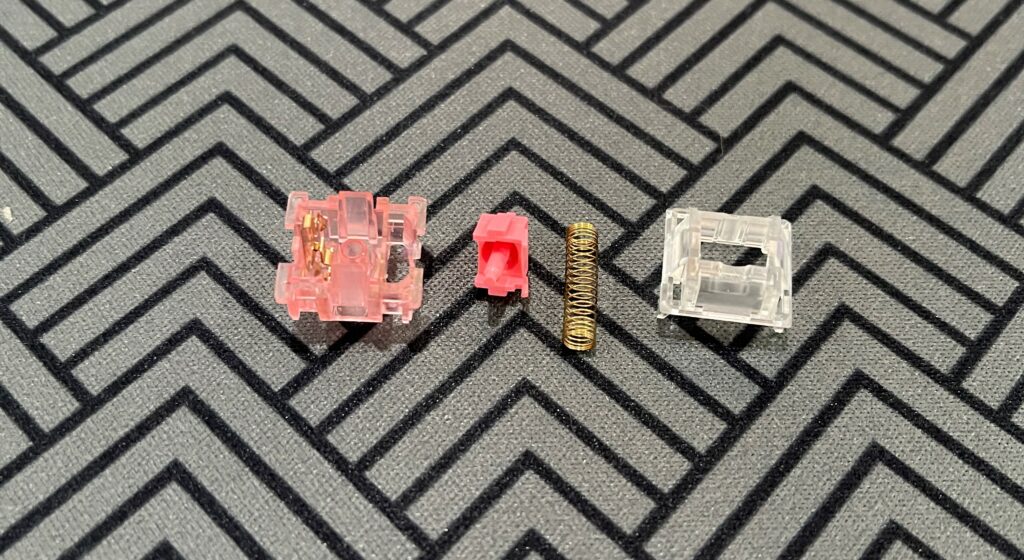
You may now examine all of the interesting components within the switch because you’ve opened it up. The bottom housing, spring, stem, and top housing are the four basic parts of a switch. Additional parts may be included depending on the switch type; for instance, a clicky switch may contain a click jacket or click bar.
If you don’t know what you’re doing, we don’t really advise disassembling Kailh box switches because they will appear particularly odd.
The Best Way to Take the Switch Out of Your Keyboard
You’ll need to take the switches out of your keyboard in order to disassemble them unless you got them in a separate bag. You must first remove your keycaps, remove all of the screws holding your keyboard together, and then de-solder the switches from the PCB in order to remove them from the keyboard. Because doing this may be fairly challenging, we’ve included a tutorial below.
A switch puller makes it simple to remove the switches from a hot-swappable keyboard. Simply remove the keycaps and use the switch puller to remove the switches. Switch removal may be a simple and time-saving with a keyboard that can be hot-swapped.
Conclusion
There are several approaches you may take to taking a switch, but they all rely on the kind of switch you have and the equipment you have at hand. Since it won’t be worthwhile to acquire a specialist tool for a few switches, we advise using a screwdriver if you just intend to disassemble a few switches. It might be wise to acquire a switch opener online if you want to disassemble all of your switches in order to avoid the time and aggravation of prying them apart with a screwdriver.
